
Nothing beats the sweeping views from a crystal-clear picture casement window. Clean casement windows usher in floods of natural light, making a room look brighter and bigger. However, getting that crystal sparkle is not easy. With their multiple moving parts and tight corners, figuring out how to clean these windows can be a challenge.
In this article, we provide expert advice on cleaning casement windows. We draw from over 30 years of experience to offer you proven techniques that are safe, simple and effective.
Like every home enhancement project, cleaning your casement windows depends on the correct toolkit. Here are a few tools you must have handy before cleaning your casement windows:
You may add mild dish soap to your cleaner. However, never use ammonia or any product with this substance, as it is a highly abrasive cleaning product that can damage modern Low-E glass coatings and scratch the glass.

Follow these steps to get your casement windows sparkling:
You will need to start with detailed prep work to make the process easier. Lay your towels or drop cloth on the windowsill or floor to protect it from dirt and dust. If your window has a screen, this is a good time to remove it. Most modern screens have simple clips you can pull to remove the screen. Once removed, you can vacuum and wash the screen with a soap and water solution and let it dry.
Then crank the window open until it is at a 90° angle to create a cleaning gap.
Clean the casement window tracks before cleaning the glass to remove the debris and dirt. Use a narrow paintbrush or vacuum to remove the dust from the window tracks and corners. Inspect the weeping holes to ensure they are unobstructed, allowing for proper drainage.
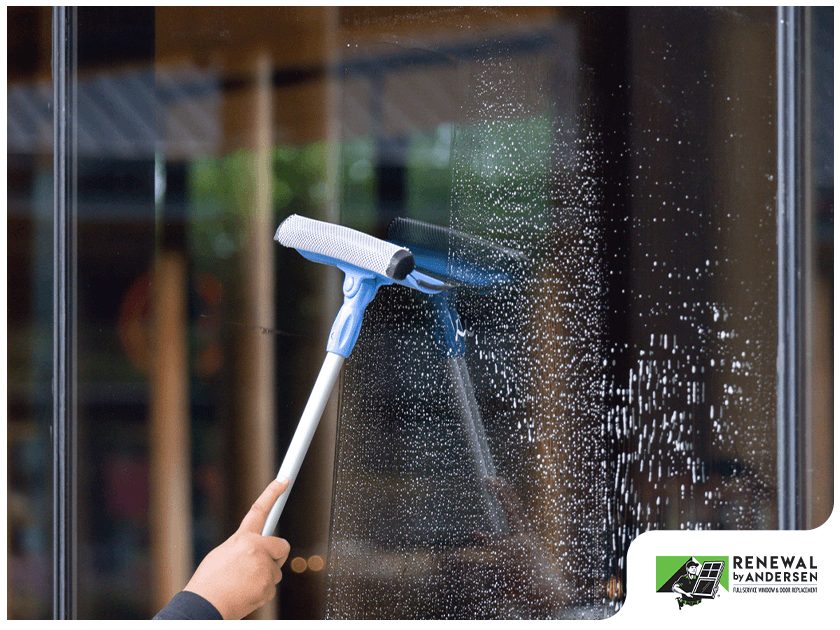
To begin cleaning your casement windows from the inside, spray the cleaner onto the window. Start with the exterior side, using the cleaning gap. Whether you are using a cloth or a squeegee, maintain smooth vertical swipes for streak-free results. Press your cleaning tool of choice against the glass and pull down.
If you are using a squeegee, remember to wipe the blade after every swipe and overlap each stroke. Repeat the same process for the inside pane.
Grab the second microfiber cloth and wipe the window dry. Buff out any remaining drops from the frame, sill and hardware, removing all water drops.
Finish your window cleaning project with some maintenance tasks. After the window is clean and dry, you will need to apply lubrication to the moving parts to keep things moving smoothly. Wipe the hinges with a cloth and lubricate with a dry silicone spray. Never use an oil-based lubricant, as it can attract dust and grime.
Lightly apply the spray to the other moving parts as well, and test their performance. Take the time to inspect your window, checking the weatherstripping to ensure it is not crushed or torn. A compromised weatherstrip can affect its performance and energy efficiency.
For the best finish, avoid these common mistakes:
Cleaning your windows in direct sunlight can bake the cleaning solution onto the glass before you can wipe it off. Once baked in, it will be difficult to remove, leaving your window with stubborn streaks. Wait for cloudy weather before washing windows, or choose the early morning before the sun rises.
Abrasive detergents, such as bleach, can damage your glass coating and discolor the frame. In some cases, using harsh solvents may lead to voided warranties. Another chemical to avoid is acetone. This liquid can strip hydrophobic treatments and even leave your windows looking cloudy if used continuously.
Whether you are using a squeegee or a cloth to wash your windows, some water is bound to get onto your sills. Placing a drop cloth or towel can help you catch any dirt or water from landing onto the sill.
Cleaning all your windows in one day can be tiring, limiting your ability to be thorough. Since you only need to clean your windows twice a year, divide the sessions by room so you don’t get overwhelmed trying to tackle every window in one day.
Tracks with dust and debris may not seal properly, leading to drafts and energy loss. Before washing your windows, attend to the tracks. Cleaning them at the beginning of the process will help you avoid a gooey mess in them that will be difficult to clean later on.
Here are the answers to some common questions about cleaning casement windows:
At a minimum, try to clean your windows in the spring and the fall. However, if you live in an area with high dust and pollen levels or your home is near a busy road or the coast, you may need to clean your windows more frequently, possibly quarterly.
We don’t recommend using power washers to clean windows since the high pressure can easily break seals and even cause fogging.
A foggy window can indicate multiple factors, including washing with hard water, cleaning the window in direct sunlight or overusing the cleaning solution. If the problem is hard water, vinegar is a good solution. Vinegar can help dissolve the minerals in the hard water, making it easier to clean off. However, if you used an excessive amount of cleaning solution, try rinsing the window with distilled water until clear.
Using correct techniques to clean your casement windows will give you clear views and bright, airy rooms. And while these techniques will work on any window, they are less of a chore with superior products. At Renewal by Andersen, we use our Fibrex® material that resists rot, heat and cracking for every window replacement. We engineered this material for lasting functionality and exceptional durability.
If you are looking for a window replacement that will last and be hassle-free to maintain, we can help. Request a free consultation today.